
Cloud Procurement
Setups:
- How to create a user in Oracle Cloud Fusion R13
- How to create an Employee in Oracle Cloud Fusion R13
- How to create a Procurement Agent (Buyer) in Oracle Cloud R13
Functional flows:
- Requisition
- How to create an Expense Requisition in Fusion R13
- How to auto-create an Expense Requisition into a Purchase Order in Fusion R13
- Blanket Purchase Agreement
Physical Counting in Oracle Inventory
Counting is used to verify the System On hand Quantity with Actual (Physical Qty) Quantity of the item and perform the adjustments in System on-hand quantity.
These are two types of counting.
- Physical Counting
- Cycle Counting
Physical Counting:
It is used to verify the System On-hand Quantity and Actual Quantity of the item based on Sub inventory or Organization and perform the adjustments. Normally we will perform this counting yearly once or twice. During Physical Counting, the Total Inventory will freeze and can't do any Transactions.
Step 1: Define the item through get on-hand quantity
Here we are defining three items like
SB_ITEM1, SB_ITEM2, SB_ITEM3

Step 2: Define Sub inventories
We are creating a sub inventories like SB_FG

Step 3: Items should have on-hand quantity
Through miscellaneous receipt we can get the on-hand quantity.
Like
SB_ITEM1 = 100,
SB_ITEM2 = 100,
SB_ITEM3 = 100


Step 4: Define Physical Inventory
Navigation: Inventory → Counting → Physical Inventory → Physical Inventories → New
Click on New, the below dialog box appears.
You add the Tolerance and Qty of your choice.

Click on Snapshot, system automatically generate concurrent program.

In above setup, Approvals can be setup in below three different ways:

Step 5: Generate Physical Inventory Tags
Navigation: Counting → Physical Inventory → Tag Generation

Click on Generate.
Now the system will run “Generate physical inventory tags” concurrent program:

Step 6: Run “Physical Inventory Tag Listing” Report
Navigation: View → Request → Submit New Request → Single Request


Output of the report:

Step 7: Enter Physical(Actual) Quantity of the Item/Physical Inventory Tag counts
Navigation: Inventory → Counting → Physical Inventory → Tag Counts
Select the Physical Inventory Name and then Click on Find
Now u will get below window:

In the above you enter the quantity as 90, 50 and 10 for all three Items: SB_ITEM1, SB_ITEM2, SB_ITEM3.
Step 8: Approve the Adjustments
Navigation: Inventory → Counting → Physical Counting → Approve Adjustments
Click on Find and Click on Yes, now you will get below window

Then u can select the Approve radio button against these 3 items and mention the approver.
Step 9: Performing the adjustments
Go to Physical inventory definition form query with our physical inventory
Navigation: Inventory → Counting → Physical Inventory → Physical Inventories

Click on "Launch Adjustments"
Now you will get below window:

Click on "Launch Adjustments"
Now system automatically generate concurrent program.
Select View →Request (Its Normal Below)

Step 10: Check out the On-hand quantity
Now go to inventory and select the on hand quantities for these 3 items as below.
Before we had 100 qty for each item after completing the physical counting we will get original qty of 90, 50 and 10 respectively.

You can also view from Inventory →Material Transaction, search for the item

This concludes Physical Counting.

Types of Move Orders
Move order is a formal request to transfer material within same inventory organization. Move Order is a request for a subinventory transfer or an account issue. Move Orders allow planners to request the movement of material within the warehouse or facility for replenishment, material storage relocations and quality handling, etc. Move orders are restricted to transactions within an organization.
If you are transferring material between organizations you must use the internal requisition process.
Oracle Inventory provides two predefined source types for all Move Orders
- Sub-inventory transfer and
- Account transfer.
Move Order approval setup is performed in Organization parameter menu.
Parameters:
Move Order Timeout Period – To define the timeout period in days.
Move Order Timeout Action – To define the timeout action whether to approve / reject the move orders automatically.
Move orders transaction details are stored in the below tables:
Mtl_txn_request_headers
Mtl_txn_request_lines
Profile option used for move order transactions is “TP: INV Move Order Transact Form”. This profile option allows the Move Order transaction mode to be set as either online, background or concurrent request.

Types of Move Orders are:
1. Requisition Move Orders
2. Replenishment Move Orders
3. Pick Wave Move Orders
4. WIP issue Move Orders
1. Requisition move orders:
Requisition move orders are manually created by users. You can set approval conditions for it at organization parameters like move order timeout period and move order time-out action. If these conditions are set then unless it is approved by planner you cannot transact it. You can allocate material before transacting the move order
2. Replenishment move orders:
Replenishment move orders are auto generated move order from inventory replenishment methods like Min Max planning, Kanban replenishment etc. These move orders are pre-approved and generated when material is sourced from another sub-inventory for same inventory organization.
3. Pick Wave move orders:
Pick Wave move orders are generated in Order management application. Pick release process generates the pick wave move order to move material from source to staging sun-inventory. This is also a pre-approved move order.
4. WIP issue move orders:
WIP issue move orders are automatically generated for backflush transfer & component issue transactions in pre-approved status.

Subinventory Transfer
User can transfer material within his current organization between subinventories, or between two locators within the same subinventory. You can transfer from asset to expense subinventories, as well as from tracked to non–tracked subinventories. If an item has a restricted list of subinventories, you can only transfer material from and to subinventories in that list. Oracle Inventory allows you to use user–defined transaction types when performing a subinventory transfer.


To do a subinventory transfer from expense to asset subinventory set the profile option INV: Allow Expense to Asset Transfer to "Yes." If it has not been set it to "Yes," it is possible to issue from an asset to an expense subinventory, but issue from an expense to asset subinventory is not possible.
Oracle Inventory expects the consumption of material at the expense location. If you return an asset item to an expense subinventory, you must be first issue it from the expense subinventory using the Miscellaneous Transaction form and transfer it to the subinventory expense account. Then, no accounting occurs and you only transfer quantities. To receive the asset item back to the asset subinventory, perform the Miscellaneous Transaction account receipt using the same expense account as the expense subinventory.
For receiving an ASSET item back, you use the Miscellaneous Transaction instead of the subinventory transfer.
Difference between Cycle Counting and Physical Inventory
S.No
|
Cycle Counting
|
Physical Inventory
|
1
|
cycle counting can be done on specific items or selective items
|
physical inventory we have to count all items
|
2
|
cycle counting can be done multiple time in an year , like monthly or quarterly for high value items
|
physical count is done once an year or at the most twice for all the items.
|
3
|
We can schedule the count
|
We cannot schedule this
|
4
|
We cannot have a snap shot
|
We can have a snap shot
|
5
|
We can view the qty in the system
|
We can not view the qty in system
|
6
|
We cane select the items using ABC analysis
|
It is done for all the items.
|
7
|
We need not to freeze inventory transactions
|
Need to freeze inventory transactions
|
8
|
Recount is possible
|
Recount is not possible
|
9
|
We can maintain recount history.
|
No recount, hence no history
|
10
|
Adjustments can be processed on approval.
|
Can be done using adjustment concurrent program
|
Order to Cash (O2C) Cycle
Step: 1 Enter the Sales Order:
Navigation: Order Management Super User Operations (USA)>Orders Returns >Sales Orders
Enter the Customer details (Ship to and Bill to address), Order type.
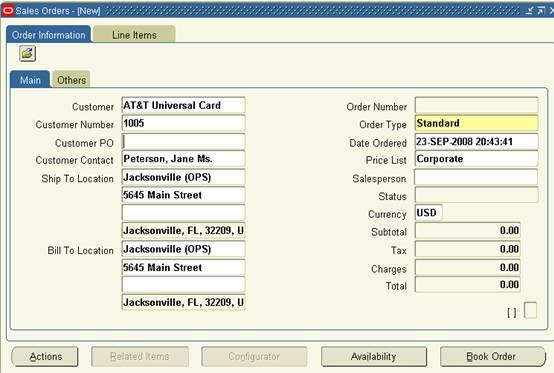
Click on Lines Tab. Enter the Item to be ordered and the quantity required.
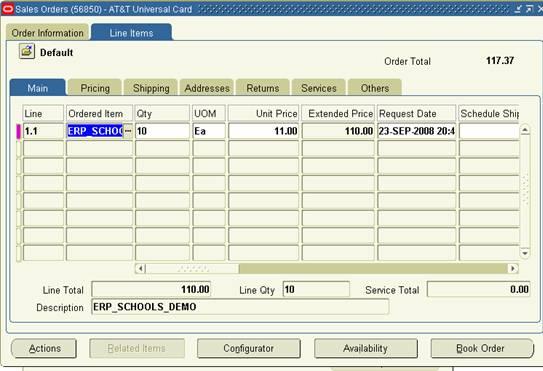
Line is scheduled automatically when the Line Item is saved.
Scheduling / unscheduling can be done manually by selecting Schedule/Un schedule from the Actions Menu.
You can check if the item to be ordered is available in the Inventory by clicking on Availability Button. Save.
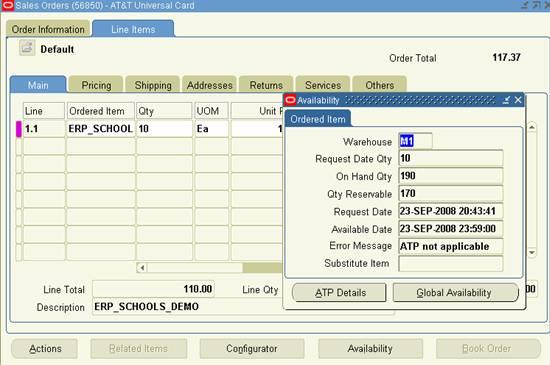
Underlying Tables affected:
In Oracle, Order information is maintained at the header and line level. The header information is stored in OE_ORDER_HEADERS_ALL and the line information in OE_ORDER_LINES_ALL when the order is entered. The column called FLOW_STATUS_CODE is available in both the headers and lines tables which tell us the status of the order at each stage. At this stage, the FLOW_STATUS_CODE in OE_ORDER_HEADERS_ALL is ‘Entered’
Step2: Book the Sales Order:
Book the Order by clicking on the Book Order button.

Now that the Order is BOOKED, the status on the header is change accordingly.
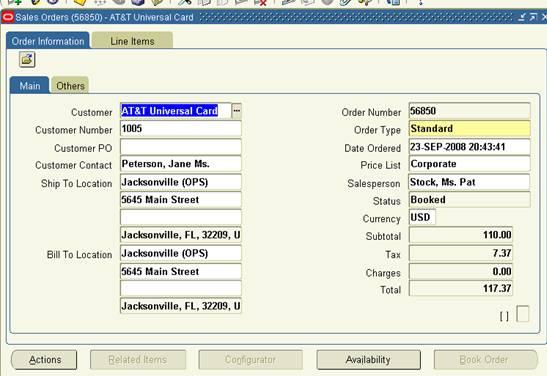
Underlying tables affected:
The FLOW_STATUS_CODE in the table OE_ORDER_HEADERS_ALL would be ‘BOOKED’
The FLOW_STATUS_CODE in OE_ORDER_LINES_ALL will be ‘AWAITING_SHIPPING’.
Record(s) will be created in the table WSH_DELIVERY_DETAILS with RELEASED_STATUS=’R’ (Ready to Release)
Also Record(s) will be inserted into WSH_DELIVERY_ASSIGNMENTS.
Step3: Launch Pick Release:
Navigation: Shipping > Release Sales Order > Release Sales Orders.
Key in Based on Rule and Order Number
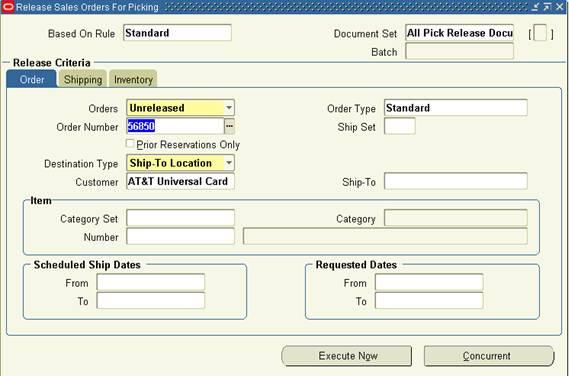
In the Shipping Tab key in the below:
Auto Create Delivery: Yes
Auto Pick Confirm: Yes
Auto Pack Delivery: Yes

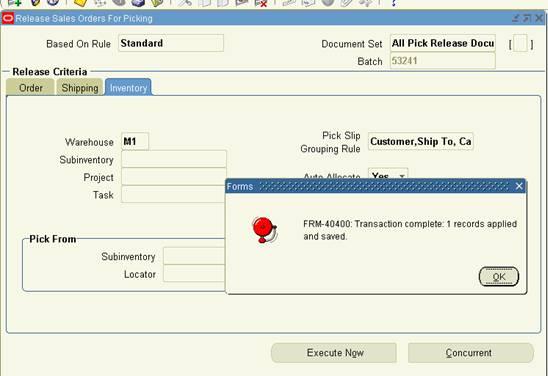
In the Inventory Tab:
Auto Allocate: Yes
Enter the Warehouse

Click on Execute Now Button.
On successful completion, the below message would pop up as shown below.

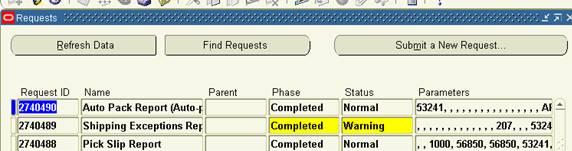
Pick Release process in turn will kick off several other requests like Pick Slip Report,
Shipping Exception Report and Auto Pack Report
Underlying Tables affected:
If Autocreate Delivery is set to ‘Yes’ then a new record is created in the table WSH_NEW_DELIVERIES.
DELIVERY_ID is populated in the table WSH_DELIVERY_ASSIGNMENTS.
The RELEASED_STATUS in WSH_DELIVERY_DETAILS would be now set to ‘C’ (Pick Confirmed) if Auto Pick Confirm is set to Yes otherwise RELEASED_STATUS is ‘R’ (Release to Warehouse).
Step4: Pick Confirm the Order:
IF Auto Pick Confirm in the above step is set to NO, then the following should be done.
Navigation: Inventory Super User > Move Order> Transact Move Order
In the HEADER tab, enter the BATCH NUMBER (from the above step) of the order. Click FIND. Click on VIEW/UPDATE Allocation, then Click TRANSACT button. Then Transact button will be deactivated then just close it and go to next step.
Step5: Ship Confirm the Order:
Navigation: Order Management Super User>Shipping >Transactions.
Query with the Order Number.
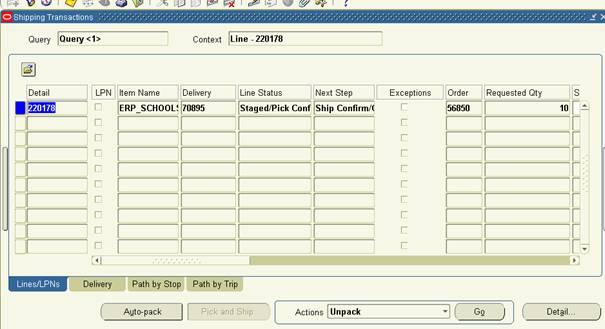
Click On Delivery Tab
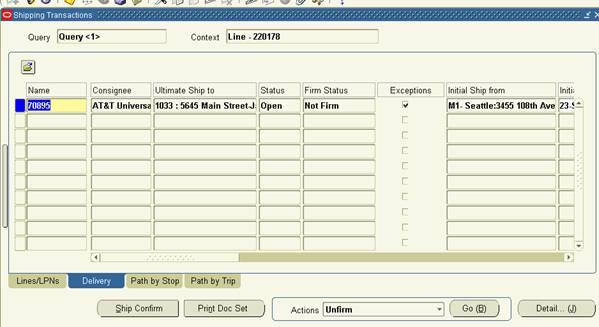
Click on Ship Confirm.


The Status in Shipping Transaction screen will now be closed.
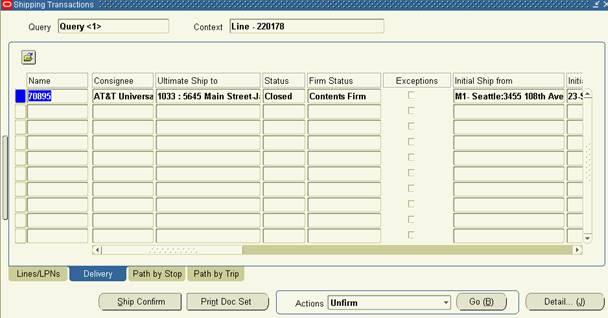
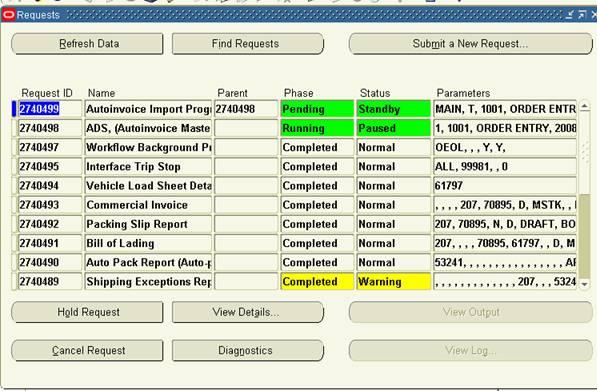
This will kick off concurrent programs like. INTERFACE TRIP Stop, Commercial Invoice, Packing Slip Report, Bill of Lading
Underlying tables affected:
RELEASED_STATUS in WSH_DELIVERY_DETAILS would be ‘C’ (Ship Confirmed)
FLOW_STATUS_CODE in OE_ORDER_HEADERS_ALL would be "BOOKED"
FLOW_STATUS_CODE in OE_ORDER_LINES_ALL would be "SHIPPED"
Step6: Create Invoice:
Run workflow background Process.
Navigation: Order Management >view >Requests
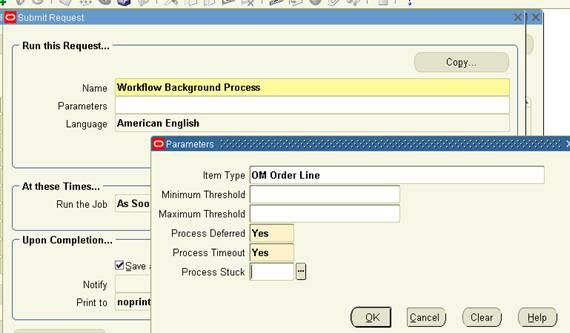
Workflow Background Process inserts the records RA_INTERFACE_LINES_ALL with
INTERFACE_LINE_CONTEXT = ’ORDER ENTRY’
INTERFACE_LINE_ATTRIBUTE1 = Order_number
INTERFACE_LINE_ATTRIBUTE3 = Delivery_id
and spawns Auto invoice Master Program and Auto invoice import program which creates Invoice for that particular Order.
The Invoice created can be seen using the Receivables responsibility
Navigation: Receivables Super User> Transactions> Transactions
Query with the Order Number as Reference.

Underlying tables:
RA_CUSTOMER_TRX_ALL will have the Invoice header information. The column INTERFACE_HEADER_ATTRIBUTE1 will have the Order Number.
RA_CUSTOMER_TRX_LINES_ALL will have the Invoice lines information. The column INTERFACE_LINE_ATTRIBUTE1 will have the Order Number.
Step7: Create receipt:
Navigation: Receivables> Receipts> Receipts
Enter the information.
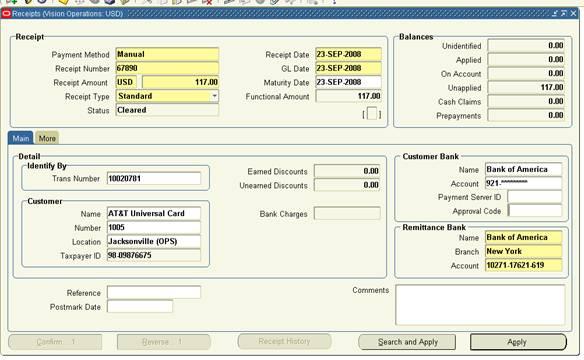
Click on Apply Button to apply it to the Invoice.


Underlying tables:
AR_CASH_RECEIPTS_ALL
Step8: Transfer to General Ledger:
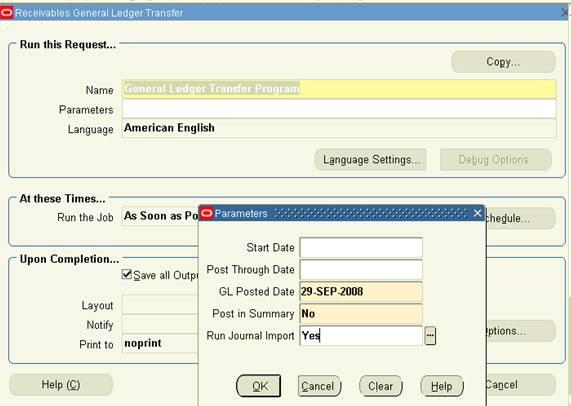
To transfer the Receivables accounting information to general ledger, run General Ledger Transfer Program.
Navigation: Receivables> View Requests
Parameters:
Give in the Start date and Post through date to specify the date range of the transactions to be transferred.
- Specify the GL Posted Date, defaults to SYSDATE.
- Post in summary: This controls how Receivables creates journal entries for your transactions in the interface table. If you select ‘No’, then the General Ledger Interface program creates at least one journal entry in the interface table for each transaction in your posting submission. If you select ‘Yes’, then the program creates one journal entry for each general ledger account.
- If the Parameter Run Journal Import is set to ‘Yes’, the journal import program is kicked off automatically which transfers journal entries from the interface table to General Ledger, otherwise follow the topic Journal Import to import the journals to General Ledger manually.
Underlying tables:
This transfers data about your adjustments, chargeback, credit memos, commitments, debit memos, invoices, and receipts to the GL_INTERFACE table.
Step9: Journal Import:
To transfer the data from General Ledger Interface table to General Ledger, run the Journal Import program from Oracle General Ledger.
Navigation: General Ledger > Journal> Import> Run
Parameters:
- Select the appropriate Source.
- Enter one of the following Selection Criteria:
No Group ID: To import all data for that source that has no group ID. Use this option if you specified a NULL group ID for this source.
All Group IDs: To import all data for that source that has a group ID. Use this option to import multiple journal batches for the same source with varying group IDs.
Specific Group ID: To import data for a specific source/group ID combination. Choose a specific group ID from the List of Values for the Specific Value field.
If you do not specify a Group ID, General Ledger imports all data from the specified journal entry source, where the Group_ID is null.
- Define the Journal Import Run Options (optional)
Choose Post Errors to Suspense if you have suspense posting enabled for your set of books to post the difference resulting from any unbalanced journals to your suspense account.
Choose Create Summary Journals to have journal import create the following:
• one journal line for all transactions that share the same account, period, and currency and that has a debit balance
• one journal line for all transactions that share the same account, period, and currency and that has a credit balance.
- Enter a Date Range to have General Ledger import only journals with accounting dates in that range. If you do not specify a date range, General Ledger imports all journals data.
- Choose whether to Import Descriptive Flexfields, and whether to import them with validation.
Click on Import button.

Underlying tables:
GL_JE_BATCHES, GL_JE_HEADERS, GL_JE_LINES
Posting:
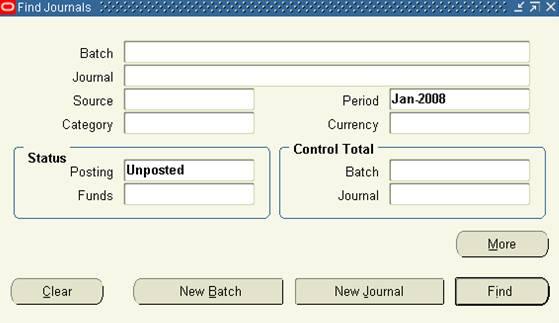
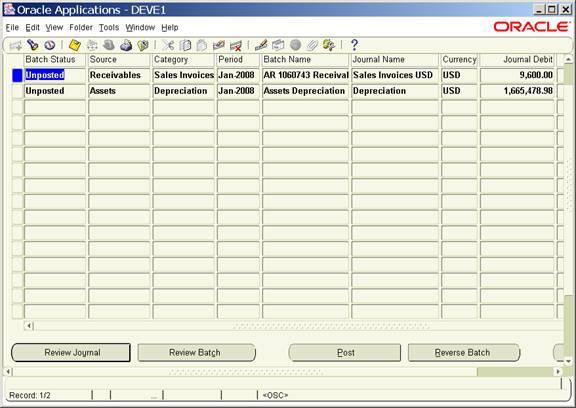
We have to Post journal batches that we have imported previously to update the account balances in General Ledger.
Navigation: General Ledger> Journals > Enter
Query for the unposted journals for a specific period as shown below.
From the list of unposted journals displayed, select one journal at a time and click on Post button to post the journal.
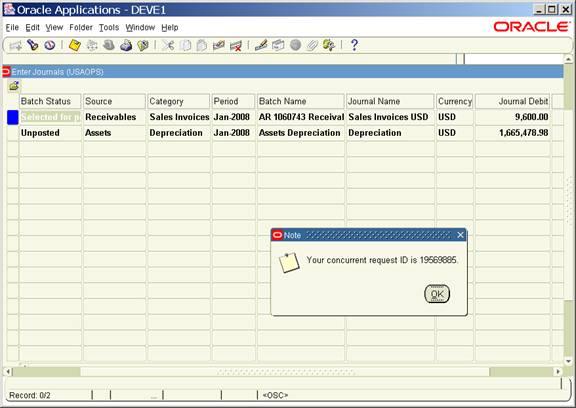
If you know the batch name to be posted you can directly post using the Post window
Navigation: General Ledger> Journals> Post

Underlying tables:
GL_BALANCES.
Subscribe to:
Posts (Atom)